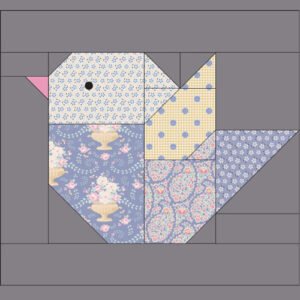
Creating a Bird Block quilt pattern is an exciting and rewarding project, whether you’re new to quilting or an experienced quilter looking for fresh inspiration. The Bird Block design, with its playful depiction of birds perched in various directions, brings a delightful and modern twist to your quilting projects. In this tutorial, we’ll cover all the steps you need to craft this beautiful quilt pattern, from fabric selection and cutting to stitching and final assembly.
Quilt patterns like the Bird Block allow you to explore your creativity and experiment with colors and textures. This tutorial will guide you through each stage of the Bird Block quilt, helping you add a unique, nature-inspired design to your collection. Let’s dive into the world of quilting and create a masterpiece together!
Whether you’re looking to make a quilt for yourself, a friend, or as a decorative piece for your home, this Bird Block quilt pattern offers a whimsical design that’s perfect for all ages. So grab your fabric, sewing machine, and quilting tools, and let’s get started!
Materials Needed for the Bird Block Quilt
To begin any quilting project, it’s essential to gather all the necessary materials and tools. For the Bird Block quilt, you’ll need a few specific fabrics and basic quilting tools. Here’s a list of everything required to make this quilt pattern:
- Fabric: Choose two to three fabric colors or patterns that contrast nicely for the bird, wings, and background. This creates a clear distinction, allowing the bird design to stand out. Generally, you’ll need 1/4 yard of fabric for the bird, 1/4 yard for the wings, and 1/2 yard for the background.
- Batting and Backing: Ensure you have enough batting and backing fabric to cover the full quilt dimensions. Batting gives the quilt thickness and warmth, while backing fabric covers the back of your quilt.
- Other Tools: You’ll need a sewing machine, rotary cutter, quilting ruler, pins, and an iron. These tools will make cutting, stitching, and piecing your Bird Block pattern both precise and efficient.
Before starting the quilt assembly, wash, dry, and iron all fabrics to prevent shrinkage. Pre-washed fabric also enhances the quilt’s final appearance and reduces wrinkling.
Cutting Your Fabric Pieces
Cutting fabric for your Bird Block quilt requires attention to detail and accuracy to ensure a uniform look in your quilt patterns. Follow these measurements for each fabric component to achieve the perfect Bird Block.
- Bird Body: Cut a 4.5″ x 4.5″ square from the fabric chosen for the bird’s body. This piece will serve as the base of your bird block and will be decorated with smaller pieces representing the wings and head.
- Bird Wings: For the wings, cut two 2″ x 2″ squares in a contrasting color to the bird body. You can even opt for patterned fabric here to give your bird a unique look and add visual interest to your quilt.
- Background Fabric: Cut two 3″ x 3″ squares and one 2″ x 6.5″ strip for the background fabric. These pieces frame the bird and make it stand out against the quilt’s background.
With all pieces cut, double-check your measurements to ensure accuracy. Accurate cutting is essential in quilting, as it allows all pieces to fit together seamlessly, resulting in a professional-looking Bird Block quilt.
Assembling the Bird Block
Now that you have your fabric pieces ready, it’s time to start assembling the Bird Block. This process requires precision but is straightforward once you have each piece laid out and ready to sew.
- Positioning the Bird Body: Begin by laying the 4.5″ x 4.5″ bird body square in the center of your workspace. Place the wing pieces (2″ x 2″ squares) on the left and right of the body to get a visual idea of how your Bird Block will look.
- Sewing the Wings: Attach each wing to the bird body by aligning the edges and sewing a 1/4″ seam allowance. Once the wings are sewn, press the seams toward the bird body. Ironing each seam flat keeps the quilt pattern neat and ensures an even appearance.
- Adding the Background: With the wings attached, sew the background pieces around the bird. Position the 2″ x 6.5″ strip horizontally beneath the bird, then attach the 3″ x 3″ squares on either side. This setup completes the basic structure of your Bird Block.
As each piece comes together, you’ll start to see the bird shape emerge in your quilt pattern. Take your time and make sure each seam is straight, as it contributes to the overall quality of the finished quilt.
Adding Details to Your Bird Block Quilt
Adding small details can bring your Bird Block quilt pattern to life. Although optional, details like the bird’s beak and eye make the design more expressive and add depth to the quilt.
- Creating the Beak: Cut a small triangle (around 1″ x 1″) from a bright yellow or orange fabric for the bird’s beak. Attach it to one side of the bird body square, positioning it to resemble a beak facing outward. Sew with a minimal seam allowance.
- Adding the Eye: You can create an eye using a small circle of black or dark fabric, or even a fabric pen. Position it above the beak for a realistic bird appearance. This small addition can give your bird character, making each Bird Block unique.
- Wing Embellishments: If desired, sew a small line down the center of each wing piece to resemble feathers. This decorative stitch adds an extra level of detail and gives the quilt pattern more texture.
Personalizing these details can add charm to your Bird Block quilt and make it feel more custom-made. Experiment with colors and fabrics for the eyes and beak to create distinct personalities for each bird in your quilt pattern.
Final Assembly of the Bird Blocks
Once you’ve completed multiple Bird Blocks, you’re ready to assemble the entire quilt. This final stage involves arranging each Bird Block to form the completed quilt pattern and sewing them together.
- Arrange Your Blocks: Lay out all the Bird Blocks on a flat surface to determine the final layout. Alternate colors or directions of the birds for a playful, visually interesting quilt. This arrangement stage helps you envision the final quilt and adjust as needed.
- Sewing the Rows: Sew each row of Bird Blocks together, aligning the edges and using a 1/4″ seam allowance. Make sure each row is pressed and flattened before moving on to the next. Ironing each row reduces bulk and ensures an even quilt pattern.
- Connecting Rows: Once the rows are complete, sew them together to form the quilt top. Pin each row at the seams to keep everything aligned, then sew with a 1/4″ seam allowance. Iron the entire quilt top one final time.
Completing this step brings your Bird Block quilt pattern to life! As you work, remember that each step adds to the beauty of the final product.
Quilting and Finishing Touches
With the quilt top completed, it’s time to add the batting and backing and then quilt the layers together. This is the final stage of the Bird Block quilt tutorial, where all your hard work comes together.
- Layering the Quilt: Place the backing fabric face down, then center the batting on top of it. Finally, add your quilt top, face up. Pin all three layers together using safety pins or quilting clips, ensuring the fabric doesn’t shift.
- Quilting the Layers: Quilt the three layers together by stitching in the ditch or adding a custom quilt pattern. Use your sewing machine to follow along the seams, which keeps the quilt pattern cohesive and gives it a polished look.
- Adding Binding: Finish the quilt by adding binding around the edges. Choose a binding fabric that complements the colors in your Bird Block quilt. Attach it using a 1/4″ seam allowance for a professional finish.
After binding, give your Bird Block quilt a final press with the iron to smooth any wrinkles. Your quilt is now ready to be admired, gifted, or displayed proudly!
Enjoy Your Finished Bird Block Quilt
Creating a Bird Block quilt is a fun and rewarding process that allows you to explore various quilt patterns and techniques. Each block adds character to the quilt, making it a truly unique piece of art that reflects your style.
Whether displayed on a bed, draped over a couch, or given as a heartfelt gift, your Bird Block quilt pattern is sure to bring joy and charm to any setting. Enjoy the process of creating, and take pride in your finished work!
Happy quilting! We hope this Bird Block quilt tutorial inspires you to explore other quilt patterns and bring more creativity to your projects.


