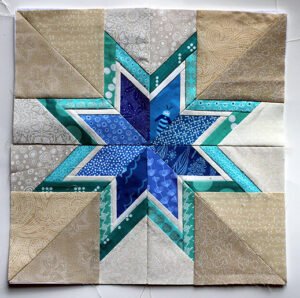
Creating a quilt block using the Lone Starburst pattern is a fantastic way to add a dazzling element to any quilt.
This paper piecing method helps ensure precision, especially with a design as intricate as the Lone Starburst. If you’re a fan of vibrant quilt patterns and are keen to learn how to make this classic yet unique block, follow along with this step-by-step tutorial.
We’ll cover everything you need—from choosing fabrics to piecing the quilt block with paper.

Materials and Fabric Measurements for a Lone Starburst Quilt Block
Before we dive into the steps, let’s go over the necessary materials. For a Lone Starburst quilt block, you’ll need a selection of fabrics for the star and background, as well as some basic quilting tools like rotary cutters, rulers, and, of course, paper for paper piecing. Choosing high-contrast fabrics can make each segment of the star pop beautifully, adding depth to your quilt pattern.
For each star segment, you’ll need fabric strips cut to specific measurements to keep the points sharp and consistent. Typically, a Lone Starburst block uses 8 diamond-shaped units, each made up of smaller diamond segments. Cut each strip to about 2 inches wide and 8 inches long for the star pieces, though sizes may vary depending on your block dimensions. If you’re aiming for a 12-inch finished block, this size should be perfect.
Lastly, for the background fabric, plan to cut larger triangles or squares. You’ll need four triangular pieces measuring approximately 6.5 inches to fill the background around the star. Remember that these measurements can be adjusted if you prefer a larger or smaller quilt block, but these dimensions create a balanced Lone Starburst.
Step 1: Preparing Your Paper Template
One of the most important steps in paper piecing quilt blocks is preparing a precise template. You can download or sketch a Lone Starburst template by dividing a square block into diamond-shaped sections that radiate from the center point. If you’re new to paper piecing, a template will serve as a guide to place each fabric segment, ensuring a perfect alignment.
Once you have your template, print or draw it onto lightweight paper, such as tracing paper or even standard printer paper. A key feature of paper piecing is stitching directly onto the paper, so using a paper that’s easy to tear after sewing is ideal. Your template should clearly label each diamond segment to make the piecing process more manageable.
Cut out each segment of the star template and label them. Number each segment to match the order you’ll sew them in; this sequence helps you avoid any confusion as you piece. This organized approach ensures each piece will line up accurately, reducing frustration as you assemble your Lone Starburst quilt block.
Step 2: Choosing and Cutting Your Fabrics
Selecting fabrics is one of the most exciting parts of making quilt patterns, and the Lone Starburst is a perfect block to showcase a mix of colors. A good rule of thumb is to select at least four different fabrics in complementary or contrasting colors. Since this pattern features a strong central point, consider using a bright or bold color for the innermost diamond to create a focal point.
After choosing fabrics, you can start cutting. For each segment of the star, you’ll need fabric pieces cut to match the dimensions mentioned earlier (2 x 8 inches). When cutting, aim for accuracy to ensure each piece aligns perfectly with the paper template. Using a rotary cutter and ruler is recommended to get clean, straight cuts.
For the background, you’ll need larger triangles or squares cut from your background fabric. This fabric surrounds the star and allows its colors to stand out. Precise cutting at this stage will make your work easier during the assembly process, especially as you align each segment of your Lone Starburst block.
Step 3: Assembling the Lone Starburst Block
With your template and fabrics ready, you can begin assembling the quilt block. Start by placing the first fabric piece face up on the back of the template, aligning it with the designated area. Place the second fabric piece right sides together with the first, and sew along the line separating the two sections. Use a short stitch length (1.5-2 mm) to make removing the paper easier later.
Continue adding fabric pieces in numerical order, pressing each one flat as you go. This process of sewing, pressing, and trimming (if needed) ensures each piece lays flat, reducing bulk in the final block. Repeat these steps for each section of the star, adding one fabric strip at a time until the entire template is covered.
Once all the fabric pieces are sewn onto the paper template, trim the excess fabric along the outer edge to create a clean edge around the block. This trimming step is crucial, as it prepares each segment to be sewn together, ultimately forming your complete Lone Starburst.
Step 4: Joining the Diamond Segments
After you’ve pieced each section, it’s time to join them to form the complete star shape. To do this, carefully line up two diamond sections with the right sides facing each other and pin along the edge. Sew along the line, removing the pins as you sew to avoid shifting. Repeat this process for all diamond segments, sewing them together one pair at a time.
Accuracy is key in this step. Align each point and corner carefully to avoid gaps between the segments. When each pair of segments is sewn together, press the seams open to reduce bulk and create a smooth finish. This pressing step is particularly helpful for maintaining a polished look in your quilt pattern.
Once all the segments are sewn, you’ll have a complete starburst shape. Now, you can sew the background triangles around the star to complete the block. By carefully sewing and pressing these pieces, you’ll achieve a professional-looking Lone Starburst quilt block ready to be added to your quilt.
Step 5: Removing the Paper and Final Pressing
With the starburst block fully assembled, it’s time to remove the paper. Gently tear away the paper backing from each segment, taking care not to disturb the stitches. A small stitch length helps here, as it perforates the paper and makes removal easier.
After removing all the paper, give your block a final press to smooth out any creases or wrinkles. Use a dry iron and press carefully to avoid stretching the fabric, especially along any bias edges. A well-pressed quilt block will lay flat and make the quilting process more enjoyable and accurate.
At this stage, you’ll see the full effect of the Lone Starburst pattern. Its radiating points and vibrant colors will make it a standout piece in your quilt. Now, your block is ready to be added to a larger quilt design, or you can create several Lone Starburst blocks to form a striking pattern across the entire quilt.
Tips for Perfecting Your Lone Starburst Quilt Block
Creating a Lone Starburst block can be challenging, but these tips will help. Firstly, take your time with each piece; rushing may lead to misalignments, especially in the pointed areas. Another helpful tip is to use a stiletto tool or even a straight pin to hold fabric in place as you sew close to the edges, giving you greater control.
If you’re struggling with paper removal, try wetting the paper lightly. This technique softens the paper fibers, making it easier to pull off without damaging the stitches. Be cautious with wetting if your fabrics are not colorfast, as darker fabrics could bleed onto lighter ones.
Finally, don’t be afraid to experiment with different color combinations. A Lone Starburst block can look stunning in any palette, from monochromatic shades to bold, contrasting colors. Each color choice will create a different effect, making this quilt pattern incredibly versatile for any quilt project.
Adding Your Lone Starburst Block to a Quilt
Now that you’ve completed the Lone Starburst block, you can incorporate it into a larger quilt. Lone Starburst blocks look stunning when arranged in a row or surrounded by other complementary blocks. To make a larger quilt, you might choose a sashing or a complementary quilt block to frame your Lone Starburst.
When piecing multiple blocks together, maintain a consistent seam allowance and take your time to align each block. Consistency in stitching and pressing will make a noticeable difference in the final quilt’s appearance. Sashing between blocks is also a great way to separate each starburst and let the design breathe, adding an extra element of sophistication to the quilt.
With this Lone Starburst block tutorial, you’re equipped to create one of the most beautiful quilt patterns. Its complex appearance and vibrant design are sure to impress, and with these techniques, you’ll have the skills to tackle even more intricate quilting projects in the future.


