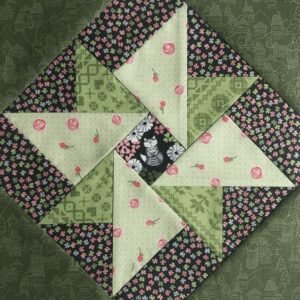
Are you ready to create a timeless and elegant quilt pattern that adds a touch of movement and charm to any quilt? In this tutorial, we’ll cover everything you need to know to make a beautiful Windmill Block Quilt Pattern.
Whether you’re a beginner or a seasoned quilter, this pattern offers versatility and visual appeal to enhance any quilt design.
Let’s dive into the step-by-step guide, including fabric cuts and measurements, to help you master the Windmill Block quilt pattern.

Getting Started: What You Need for a Windmill Block Quilt
Creating a Windmill Block requires only a few materials, making it a straightforward project to add to your quilting repertoire. Gather fabric in contrasting colors, a rotary cutter, a cutting mat, and a ruler to ensure precise measurements. You’ll also need basic quilting tools like pins, an iron, and a sewing machine for clean and consistent seams.
For this tutorial, we’ll use two contrasting fabrics to highlight the “windmill” effect. Choose one light fabric and one dark fabric to create a bold, eye-catching look. This contrast is what brings out the unique spinning illusion of the windmill block, making it one of the most dynamic quilt patterns.
Having a clear layout is essential, so make sure to work in a well-lit space and organize all your tools and fabrics before starting. If you’re working on a large quilt, consider laying out multiple blocks on a design wall or floor area to visualize how the pattern will look when finished.
Fabric Requirements and Cutting Guide
To start, you’ll need two contrasting fabric colors—Fabric A (light) and Fabric B (dark). For a single Windmill Block, the finished size will be 12 x 12 inches. Each block requires a few squares and triangles, so let’s go over the precise cuts:
- For Fabric A: Cut two squares of 4 1/2 x 4 1/2 inches and four triangles measuring 3 1/2 x 3 1/2 inches when cut along the diagonal.
- For Fabric B: Cut two squares of 4 1/2 x 4 1/2 inches and four triangles measuring 3 1/2 x 3 1/2 inches along the diagonal as well.
If you plan to make a quilt with multiple Windmill Blocks, calculate the number of blocks needed based on the quilt size and multiply the fabric requirements accordingly. Cutting all pieces at once can save time and ensure uniformity across blocks. Use a rotary cutter and ruler to make precise cuts for each square and triangle, as accuracy is crucial for alignment.
Step 1: Assembling the Triangles
Now that you have your triangles, it’s time to piece them together. Take one triangle from Fabric A and one from Fabric B and place them with the right sides together. Line up the edges and pin the pieces to secure them before sewing.
Use a 1/4-inch seam allowance to sew along the longest edge of the triangle pair. Once sewn, open and press the seam toward the darker fabric to avoid bulkiness. Repeat this process with all triangle pairs until you have four half-square triangles (HSTs).
After pressing, trim any excess to ensure the triangles remain consistent in size. This step helps create a clean, professional look and will make assembling the windmill block easier. If necessary, square up each HST to maintain accuracy.
Step 2: Arranging the Pieces
With your HSTs ready, it’s time to arrange them with the 4 1/2 x 4 1/2-inch squares to create the windmill layout. Lay out the four HSTs and the four squares on a flat surface, alternating the colors to form the windmill pattern.
The correct arrangement is essential to achieving the desired windmill effect. Place each piece so that the contrasting colors form a rotating, clockwise or counterclockwise pattern. Adjust the positioning if necessary until the windmill pattern becomes clear.
This layout step is critical in ensuring that each block looks cohesive. Take a moment to step back and observe the overall arrangement before moving on to sewing.
Step 3: Sewing the Pieces Together
Now it’s time to start piecing your block together. Begin by sewing two squares and two HSTs together in a row. Repeat this step with the remaining pieces to create a total of four rows.
Align each row carefully and use a 1/4-inch seam allowance to join the squares and HSTs. Once all rows are sewn, press the seams toward the darker fabric or in a way that reduces bulk in the final assembly. This will help create a flat, professional finish.
Next, sew the rows together to complete the Windmill Block. Pin the rows to avoid shifting and align seams accurately for a crisp, clean look. Press the entire block to set the seams and smooth any wrinkles, revealing your finished Windmill Block quilt pattern.
Step 4: Final Adjustments and Tips for Perfect Blocks
After completing your Windmill Block, it’s time for final adjustments to ensure it is precisely 12 x 12 inches. Use a square ruler to measure the block, trimming any excess fabric if necessary. This step will ensure uniformity across all blocks in your quilt.
If you’re creating a full quilt with multiple windmill blocks, take the time to check each block size before joining them. Consistent sizing is essential to achieve a cohesive look in your final quilt. Lay out all blocks to visualize the finished product and make adjustments as needed.
To enhance the windmill effect, consider adding sashing (strips of fabric between blocks) or a border to frame your quilt. Sashing helps define each block and can add contrast to make your quilt pattern truly stand out.
Tips for Customizing Your Windmill Block Quilt Pattern
Creating a Windmill Block quilt allows for endless customization. Experiment with different fabric colors and prints to create unique, personalized looks. For a modern aesthetic, try monochromatic or low-contrast color schemes. Bright colors and high contrast fabrics can add a bold, traditional appeal.
Additionally, try varying the block sizes for a different layout effect. While this tutorial covers a 12 x 12-inch block, making larger or smaller blocks can transform the look of your quilt. Smaller blocks create a denser quilt, while larger blocks make the windmill pattern more prominent.
Finally, if you enjoy hand-quilting, consider adding a decorative stitch along the seam lines to emphasize the windmill design. This added touch can create beautiful texture and bring your quilt to life.
Creating the Perfect Windmill Block Quilt
Making a Windmill Block quilt pattern is a rewarding project that brings both charm and complexity to your quilting skills. By mastering this classic block, you add a unique, dynamic pattern to your repertoire. Remember to focus on precision in cutting and sewing, as these details ensure a professional-looking quilt that will last for generations.
Quilting is as much about the journey as it is about the finished product. Take your time with each step and enjoy the process. With the Windmill Block quilt pattern, you’ll have a timeless quilt that showcases the beauty and artistry of this wonderful craft.


